At the character generation screen, always increase all stats that you can (that includes hit points) to as high as they will go.
If you want a mage, cleric or paladin to use a two handed weapon as well as magic, then do the following. Put the weapon down on the ground, and their spellbook or magic symbol in their second hand. Click the right mouse button on this for a list of spells to appear. Pick up the two handed weapon and place it in the characters primary hand. As the list of spells is still up, they can now cast spells and use a two handed weapon at the same time. You will have to repeat this process after using the compass etc.
On the wasp level, stand on the spot where the two rooms join (the room to the south which has a crack in the wall - the hornet's nest) and rest. This should generate four wasps which can be killed easily to gain experience points.
EYE OF THE BEHOLDER 2 (EOB 2) is similar to the prequel in the graphics and sounds departments. Anyone who has played the first game should feel right at home here within the first few minutes of game play. But don't get too comfortable! Although the individual levels in this dungeon are generally smaller and less complicated than those in the first game, this is no cakewalk.
Survival is the biggest challenge in the game. You may generate new characters for this game who will start at about level 7, or you may elect to transfer your more powerful party from the first game. Don't expect to see a lot of character advancements. New characters will probably advance to level 10 or 11 by the end of the game. This was no doubt planned in the design phase in anticipation of a third game in the series.
Combat is very tightly balanced. Some monsters overwhelm your party with sheer numbers while others can cast magic spells that can destroy most of your party in the first round. You will need to devise special strategies against different enemies, even spells and items to be used against them should be planned out ahead of time to insure success.
Unlike the first game in which there was a specific number of monsters on each level and they did not randomly regenerate, most monsters do regenerate in this sequel so that you can never clean out a level and expect to explore in peace.
One very useful tactic in fighting really deadly monsters is the melee-sidestep tactic. Here's a brief description for those not familiar with it: when your party encounters a specially powerful monster, back up immediately after each blow to keep out of melee range. Check your map and look for any nearby area that is at least 2X2 in size. Continue to attack and then back up and lure the monster into the area you have chosen.
Once you reach this area, attack the monster and then immediately step to one side. If the monster also sidesteps to face you again, hit it once and them immediately sidestep again. Do not try to strike more than one blow as that might give it enough time to make an attack. The idea is to keep attacking and staying out of its range. It's tedious, but very effective against monsters that can do serious damage with just one blow. Timing is often critical when you use this tactic. You might wish to use a combination of the mouse and the keyboard or even the keyboard alone. Practice makes perfect!
You should definitely include a mage and a cleric in your party, together with a couple of fighters. Certain rooms can only be entered if you have a thief in your party. The thief however, serves no other purpose and I do not recommend including one in your starting party. You can recruit someone later in the game. I should also point out that the cleric profession in EOB 2 comes with the CREATE FOOD spell, which is essential to completing the game, since it did not appear that there were enough rations to be found in the game. Also, remember to use the Scribe Scroll to Spell book option each time you pick up a mage scroll.
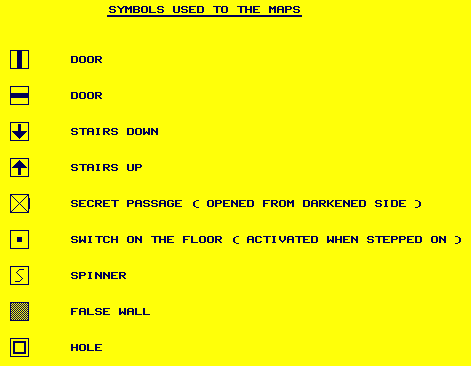
The dungeon levels are quite small, but the stairs gave me a lot of problems as they did not necessarily lead to a different level. I followed this rule of thumb when drawing the maps: whenever I took a set of stairs, if the game stopped to load more data from the disk, then I assumed the stairs led to a new level. I also marked each matching pair of upstairs and downstairs with the same letter in the hope that this would make it a bit easier for you to follow the trail.
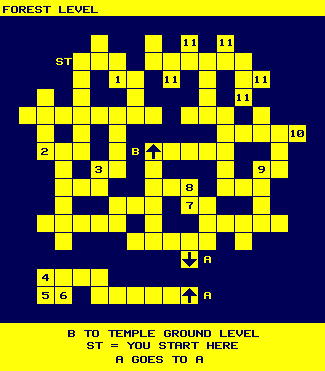
This is an easy area. The only enemies you face here are the dire wolves. They are not that ferocious and shouldn't give your party too much trouble at all.
Pick up the rocks at (1) and (2). At (3) you will meet a woman who wish to lead you to the Temple of Dark Moon. If you accept, the game will whisk you directly in front of the temple. Since you are quite done with the forest area yet, you should decline. As an alternative, you can also kill her at this time. If you do, you will get to read a parchment that hints at something rotten going on inside the temple. If you decide to just decline her offer, she will pop up somewhere else in the forest.
Take the stairs A to the hidden area of the forest. Here you will find the mage scroll of BLUR (4), some rotten food (5) and leather armor (6). Return to the forest and pick up the rusty dagger at (7) and the rocks at (8) and (9). The two arrows at (10) should come in handy later. (11) is a grave. There are five of them. You have the option to dig up the graves but don't do it. There's nothing valuable to be found and you will find your characters cursed for their trouble.
That's all there is to discover in the forest. When you are all set, go to location B where you will enter the Temple of Darkmoon.
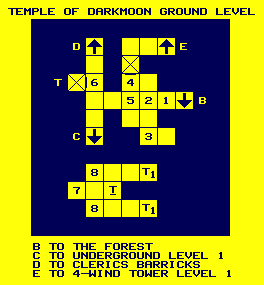
After entering the temple, there are several ways to continue. At (1) if you smash the decorative windows on the north and south walls, the 2 clerics will attack you. If you do not break the windows at (1), then you will carry on a conversation with the clerics at (2). You can also choose to attack them here. If you do not attack them at (2), then you will meet another character at (3) and learn about another missing person, Calandra. Choose any course of action you like. It will not alter the rest of the game.
At (4) Note the 4 wind carving on the north wall. This will be important later. At (5) is a door which you can open by pushing the button on the right. If you haven't fought it out with the clerics up to this point, they will forbid you from entering the door. If you want to see more of the game, you must ignore them and enter the doorway. At this point in time, the clerics will attack you, and you may as well take care of them now.
You may argue that in this situation you are really the aggressor and that there isn't enough justifiable reason to kill the clerics. I'll just say that in order to carry on with the game, the clerics have to be killed sooner or later, and leave the moral issue for you to mull over.
At (6) there is a secret button on the west wall. Push it to open the wall and reveal a teleporter. This teleporter leads to a small resurrection chamber. At (7) is a plaque that tells you may use the service of this chamber 3 times. At (8) is a holy symbol that takes care of the actual resurrection process. We will be returning to this area later in the game.
Here's a little surprise: There are actually _two_ identical chambers. When you use the teleporters at (9), you will be teleported randomly either to the temple ground level or to the other chamber. You are allowed to use the holy symbol for resurrection 3 times in one chamber only. The holy symbol in the second chamber has no power. A good trick would be to drop a rock or a bone in front of the holy symbol in one chamber. This way you can quickly identify which room you have arrived at after using the teleporter. I could not find any other use or purpose for the second chamber.
If you have trouble using the teleporter(s) to return to the temple ground level, try facing west and walking _backwards_ into the teleporter.
We'll now do some serious dungeon exploration by taking the stairs C down to the Temple Undergrounds.
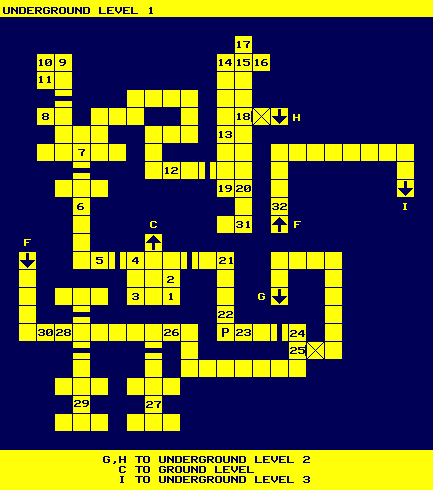
After descending Stairs C, pick up the rock at (1). There's a keyhole at (2) but you don't have a key for that yet. Pick up two more rocks at (3) and then open the west door at (4) by pushing the button. There is another rock at (5). When you step on the pressure plate at (6) the door to the north opens. Get ready to fight a few guards at (7). You'll get a grey key, plus a weapon or two as loot.
Push the lever at (8) to open the north door. You'll have another guard to fight. Smash the barrel at (9) to get iron ration. There are more iron rations on the alcoves at (10) and (11).
There is a pressure plate at (12) that opens the door to the east. But the plate must be weighed down for the door to stay open. Drop a rock at (12) and then enter through the door. There are a couple of guards at (13) that you must take care of. Be sure to pick up the lock picks after the fight. (14) is an empty barrel. You'll find rations after smashing the barrels at (15) and (17). The barrel at (16) contains 3 bags of magic dust which can cure paralysis.
At (18) check out the east wall for a secret button. Push it to reveal stairs H leading to Underground Level 2. But we want to finish exploring level 1 before going down there. There is another grey key in the niche at (19). You are probably tempted to try out the grey key(s) in the keyhole at (20). But for reasons that will be obvious later, let's not do that yet. We'll return to here after we finish checking out the rest of this level.
Retrace your steps to (2). Use the one of the grey keys in the keyhole. The door to the east is now open. Pick up the two rocks at (21). Push the lever at (22) to fill in the pit to the south. The pressure plate at (23) opens the east door and re-opens the pit now behind you. You will have to stand your ground against 4 guards that emerge from the door. You'll get 2 more grey keys after defeating them.
The lever at (24) fills in the pit once more. Look for a secret button at (25) to open up the secret passage to the east. Use a grey key in the keyhole at (26) to open the south door. There are more guards to fight here. There's an old dagger in the basin at (27). Use another grey key in the keyhole at (28) to open the south door. After defeating the guards that emerge, pick up the north wind horn at (29). Read the parchment lying beside it. That should give you a good idea where to use the horn and its three companions when you find them.
As soon as you step on (30), the door to the north east will open. There are two more guards that you have to defeat. You'll get another grey key for your effort.
Now that we have explored all of this level, return to (20). Use a grey key in the keyhole to open the south door. IMPORTANT: Before entering the door, be sure to rest to recover all hit points and spells.
At (31) you will find Insal the thief. Allow him to join the party and feed him a food ration so he doesn't starve. Give him the lock pick but nothing else. Put him in the middle row of your party so that he doesn't get hit easily by during enemy encounters.
There are several doors in the game that can only be opened by a thief picking the locks. There are no keys or other means to open these particular doors. That's the main reason for recruiting Insal. However, Insal will leave the first time you rest your party. Thus, we must make a couple of detours and visit the doors that require Insal's lock picking skill before the party has to rest again.
Take the nearby stairs labelled H down to Underground Level 2.
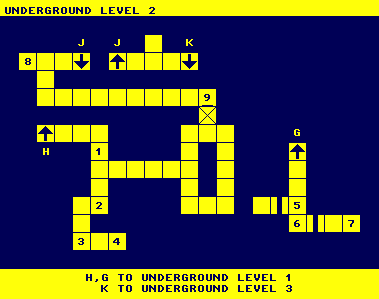
This level is populated by a few poisonous spiders, hence the webs you see from time to time that block your path. The webs can be easily destroyed by swinging your weapons at them.
Pick up the rocks at (1), (2) and (3). Be sure that you get all the loots at (4) which include a cleric scroll of Neutralize Poison, a mage scroll of Magic Missile and a copper key. There is also a parchment here which showed part of the layout of level 1 and 2. (Actually the parchment might be a hint that this region should be part of level 1, but I had lots of trouble in accounting for the stairs.)
You may want to check out the loop to the east. There is nothing noteworthy there except you will be ambushed by a couple of spiders each time you go through the loop. Note that you cannot open the secret passage north shown on the map from the south. Return to level 1 via stairs H.
Using the map GROUND1.IFF, find your way to stairs G and take it to get to the other area on level 2.
Stairs G lead to a very short hallway with two doors. Push the button on the door at (5) to open it. The only interesting thing to note here is that if you fall through the pit on level 1 (there's only 1 pit on level 1), you end up behind this door. The door can then be opened by throwing a rock at it.
There is a keyhole at (6). Unfortunately I never found a key that would fit it. Save the game here and then try picking the lock by clicking the lockpicks over it. You may have to do it several times. (Note that if you do not have a thief in your party, the game will not allow lockpicking to take place.) If the lock pick breaks, restore the game and try again. Successfully picking this lock will open the door to the east. Pick up the skull and the mage scroll of Lightning Bolt at (7). Return to level 1 via the stairs labelled G.
On level 1, using the map GROUND1.IFF, locate the set of stairs labelled C and take them back to the Temple Ground Level (GROUND0). Take the stairs labelled D up to the Cleric Barracks (BARRACK).
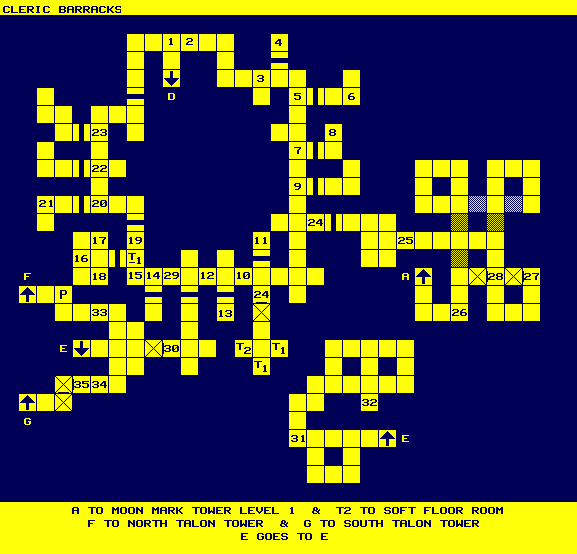
Shortly after arriving at this level, you will confront an angry priest. Your choices are limited. Attack him.
The reason why we are on this level at this time is that we need Insal's lockpicking skill to open three doors on this level that would otherwise remain close for the entire game. This being a walkthru, I need to provide you with a solution that will let you see as much of the game as possible.
As I have said before, Insal will leave as soon as the party tries to rest. So what we need to do here is to survive without resting until Insal can get the three doors opened. Your opponents on this level are clerics. To a party with low level characters, they can be rather tough. Be sure to save the game after each successful battle.
Use the copper key in the keyhole at (2) to open the door to the east. Pick the lock at (3) to open the north door. Pick up the mage scroll of invisibility at (4).
Push the button on the door at (5) to open it. There are a lock pick and a spell book at (6). At (7) push the button on the east door to open it. Click on the bed at (8) and you will find another copper key.
Use the copper key at the keyhole at (7) to open the south door. There are 4 clerics that you must defeat at the other side of this door and you will get another copper key once you beat them. You can open the door at (9) by pushing the button on the door, but there is nothing behind it. Do not waste time at the next door to the south that is guarded by a magic mouth. It will be quite a while later before you can get through that.
Use Insal's lockpicking skill at (10) to open the door to the north. Pick up 2 magic dusts at (11). Next pick the lock at (12) to open the door to the south. You should find a magic dust, a complete set of elf bones and a parchment at (13). Reading the parchment will reveal that the elf bones belong to Amber, the scout sent by Khelben.
When you step on (14), the door to the south will open and you will be attacked by another group of clerics. Pick the lock at (15) to open the west door. (16) is a stone portal. Players of EYE 1 will recognize it immediately. The portal can only be activated by stone artifacts that you will find later in the game. There is a very handy mage scroll of Improved Identify as well as another copper key at (17). At (18) there is a button for opening/closing the door.
At this point, Insal has served his purpose. Drop him from the party by CAMPING and then selecting the proper option from the menu. (If you let him leave by himself while you rest, he will steal things from your inventory!) Take a well deserved rest here to recover hit points and spells.
Use a copper key in the keyhole at (19) to open the north door. Push the button on the door at (20) to open it. Inside the room is a cleric scroll of Create Food at (21). At (22) you have the opportunity to eavesdrop on a conversation, after which you will fight a couple more clerics. The button on the door at (23) opens it but there is nothing of interest inside.
Retrace your steps to (24). There is a statue here. Swing your weapons to destroy the statue. You will find a button on the wall after hacking the statue to pieces. Push the button to open up the passage south. At the end of the passage, you are surrounded by three teleportation fields. The ones to the south and east simply move you to just outside the door of the stone portal room. But the one to the west will teleport you to the Soft Floor Room (NTALON&SOFTFLR).
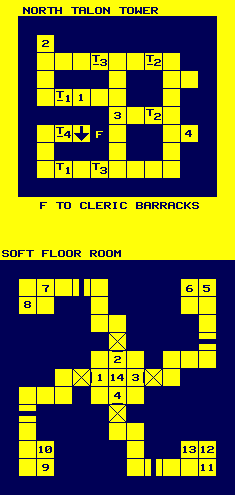
You arrive at (1) in this room. There is a blue gem here. Elsewhere in this 3X3 room, you should find a copper key, a green gem and a red gem at (2), (3) and (4). In the center of the room is a soft spot, but you won't be able to do much there at the moment.
Each of the 4 secret passages shown on the map can only be opened if you place all three gems (blue, green and red) in the same alcove. The gems will be gone forever as soon as the wall disappears to reveal the passage. This means that you can only access one out of the four hidden areas. Here's a description of what you will find in each area to help you decide which passage you wish to access.
The eastern passage leads to some very nice items: you will find a cleric scroll of Raise Dead, a +2 2-handed sword, a +3 platemail, a ring of adornment, a skull, a femur, a parchment from Lord James of Natingdale and a tropelet seed at (5). Unfortunately, the plaque at (6) happens to be true. This is a trap with no way out. You will be stuck here if you choose the eastern passage.
The northern passage leads to a door. When you step on (7), two darts will be fired at you from the south. They will miss if you are prepared and move away quickly enough. There is a warning plaque at (8) and you will be attacked by clerics there. A tropelet seed is all you get for your trouble.
The western passage leads to a 2-handed sword, 4 iron rations and a tropelet seed at (9). There are 4 more iron rations at (10).
Personally, I think the southern passage is the most rewarding. At (11) is a plaque that reads "Emergency supplies". You will find a wand of magic missiles, a mage scroll of lightning bolt and a tropelet seed at (12). At (13) there are 2 potions of extra healing, a potion of vitality and a potion of healing.
When you are ready to leave the Soft Floor Room, stand one square away from the center of the room. Then drop the tropelet seed on the soft spot (14) (select the seed then click it on the round spot). A teleportation field will appear. This will bring you back to the exact same place you were before on the Cleric Barracks level.
You have explored all you can on the Barracks level. Take the set of stairs labelled D to return to the temple ground level. (GROUND0). Use the teleporter T to go to the resurrection chamber. At (7), click on the holy symbol on the wall. You will now be offered an option to resurrect Amber, who turns out to be a female thief/mage. It's up to you whether you want her in your party. Return to (6) by walking backward into either teleport T1.
We are now ready to resume our exploration of the underground. Take the stairs labelled C down to Underground Level 1 (GROUND1). Use the map to get to the stairs labelled F. When you emerge from the stairs F, location (32), check for a secret button on the east wall. This opens a hidden niche which contains a sling and a cleric scroll of Raise Dead. Follow the corridor and take the stairs labelled I down to Underground Level 3 (GROUND3).
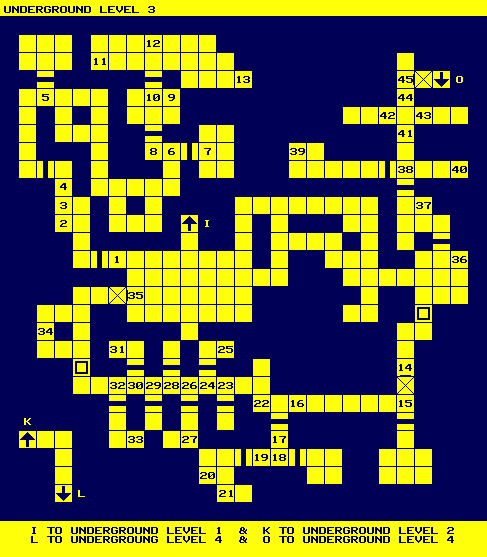
Use a grey key in the keyhole at (1) to open the door to the west. Location (2) is kind of tricky. Whenever you step here, you trigger a fireball to shoot at you from the north. There is also a lever here on the west wall. What you need to do here is face the west wall, then step up to (2), quickly pull the lever and then back up. If you do it fast enough, you can avoid the fireball. You may wish to use the keyboard to control the movements and use the mouse to click on the lever. Once you pull the lever, a skull key will appear in the alcove at (3).
Use the skull key at the skull lock at (4) to open the west door. When you step on (5), the door to the north will open and you will be attacked by 4 undead warriors. The undead warriors can be quite troublesome for a low level party. You should use the fight and move technique whenever possible. Same thing happens at (6). When you get here, the door to the east will open and you will be attacked by a mixed group of cleric and warriors. You will get another skull key after defeating this group. On the other side of this door (7) is a button that opens/closes the door. This will come in rather handy, as we shall soon see.
Use a skull key in the keyhole at (8) to open the door to the north. At (9) there are another skull key, a +1 robe and a +2 dagger. (10) is a door that can be forced open. You should save the game here. Behind this door are many undead warriors and clerics (I counted 24!) waiting to do battle with you.
This is one technique that worked for me: after forcing open the door at (10), take 2 steps inside to attract the attention of the enemies. Back out immediately. Wait for the enemies to pursue, and then lure them out of that area until you are standing at the doorway between (6) and (7). Don't move too fast. If you lose sight of them, they may not pursue you. Once you get to the doorway, turn around and fight them. Save the game here when you have a chance.
There are two reasons to choose this particular spot to fight. First, this guarantees that you will not be attacked from the sides or from behind. Second, when your characters need to recuperate, you can back up one position and push the button to close the door. If you time it properly, you can close the door and isolate yourself in the room. (The door cannot be opened from the other side!) This allows you the opportunity to rest and recover all of the hit points and spells. When you are ready, open the door, quickly step up to the doorway and fight again.
Beware that sometimes the enemies come in groups. After you dispatch one group, there may still be more waiting back behind the door that you forced open. As I said previously, I killed 24 warriors and clerics before I could move around freely inside the forced door. At (11) there is a cleric scroll of Neutralize Poison. At (12) there are 2 iron rations, a cleric scroll of Cure Serious Wounds, a helmet and a +2 short sword "Sting". Finally at (13) there are a cleric scroll of Neutralize Poison and a Darkmoon Key.
Retrace your steps and explore the east side of the entry stairs. Go through the illusion wall at the SE corner to location (14). A secret button on the south wall here opens up the passage south. Push the button on the door at (15) to open it. You'll have to do another battle here with warriors and clerics.
At (16) use the last skull key to open the door. There are two clerics to fight here. You will get a cleric holy symbol and another Darkmoon key when you defeat them. Push the button on the door at (18) to open it. There isn't anything behind that east door. The door at (19) can also be opened by pushing the button on the door, if it's not opened already.
There are a pile of things to be picked up at (20): a skull key, an iron ration, a +1 helmet, a +1 long sword, a +1 shield, +2 plate mail and a spell book. At (21) you come face to face with Calandra, the sister of the woman you met when you first entered the temple. She is a level 9 fighter. Decide whether you want her in your party or not.
At (22) you should find 2 clerics waiting for you. There's no choice here but to fight them. At (23) there is button on the north wall that opens the door to the south. At (24) the button on the south wall opens the north door. There is a complete set of Elf bones at (25). This should be picked up and carried.
At (26) the button on the north wall opens the south door. At (27) you will meet and free another prisoner, Shorn Diergar who is a dwarven cleric/fighter. You'll have to decide if you want him to join the party.
At (28) and (29), there are buttons on the south and north walls respectively that open the doors on the opposite side. Push the button on the south wall at (30) to open the north door. There is a skull at (31). Finally, open the south door at (32) by pushing the button. There is a femur bone at (33). At (34) there are a potion of vitality and a potion of cure poison.
The secret passage shown in this area can only be opened from the east side (35). If you wish to try it, retrace your step to (35). You'll find a secret button on the west wall which reveals the passage.
The two Darkmoon keys that you have been carrying around can now be used in the keyholes at (36) and (37). At (38) you will get a vision of Khelben and sort of a recap of the story so far. There is also a door to the west at (38) that you can open by pushing the button on the door. There are quite a few things in this room: the East Wind Horn, 2 potions of healing, a potion of speed and a parchment which hints at a hidden passage. At (40) there is another parchment which confirms the existence of a hidden passage.
There is yet another parchment at (41). You'll have to interpret the significance of this one yourself. I never quite figured that out. There are pressure plate at (42), (43) and (44). The first time that you turn and step forward on each one, a fireball will shoot at you from the wall you face. All of them can be avoided by going backward and then ducking sideways when possible. There is nothing noteworthy behind the plates at (42) and (43).
Step on the plate at (44), then back up to location (38) and then sidestep once to the east. After the fireball misses, you can step back onto (44) again without triggering another fireball. Examine the east wall at (45). Swing your weapon at the wall. (You may have to do that more than once). The wall will crumble and reveal stairs going down. (Labelled O on the map)
At this point, you should return to the resurrection chamber and resurrect the set of Elf bones that you found at location (25). This turns out to be San Raal, a level 8 mage. Again you have to decide if you want him to join your party.
Return to the stairs labelled O on Underground Level 3. The next level is the infamous "no rest" level where your party is not allowed to rest until the escape route is discovered. Thus you should take the time to prepare the party as thoroughly as possible. Have your cleric cast a Create Food spell. Carefully select all the spells you wish your mage(s) to memorize and your cleric(s) to pray for. Then rest until everyone is completely healed. Take the stairs down to Underground Level 4.
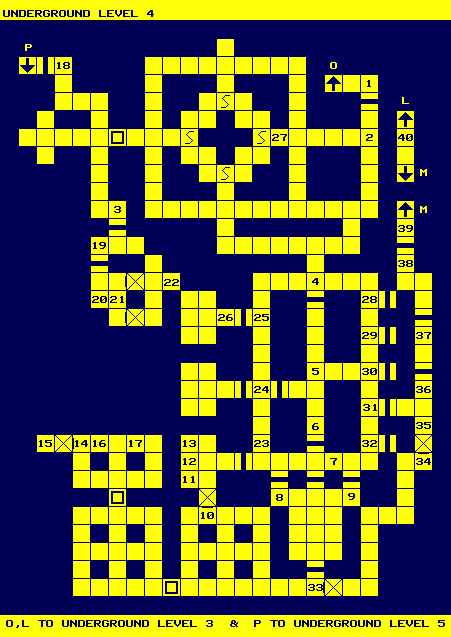
Resting is not allowed on this level. Therefore, the main goal here is to discover at least one of the 2 escape routes as soon as possible before fully exploring the rest of the area. When your mage(s) and cleric(s) use up their spells, use the scrolls and potions that you have accumulated in order to survive. The margoyles that inhabit this level can be quite tough on low level parties. Use the fight/move tactic whenever possible to minimize injury.
The plaque at (1) gives an ominous warning. The plate on the floor at (2) closes the entry door. This cannot be avoided. It is impossible to return to level 3 through that door. Go all the way to the end of this corridor then turn west and follow the trail all the way to the end. Go north 4 spaces and then west. Go through the illusion wall shown on the map. Get the spider key, the potion of healing and the skull at (3).
Retrace your steps and open the door at (4) by pushing the button on the door. Pick up the mage scroll of Remove Curse at (5). Push the button on the door at (6) to open it. Use the spider key in the keyhole at (7) to open the middle south door. There are buttons at (8) and (9) that open the other 2 doors. However, it is better to leave those 2 doors closed to reduce the chances of getting ambushed on 2 sides.
In order to open the door behind the 9 pressure plates in this room, weigh down the plates at the 4 corners as well as the one in the center with items. A good choice would be all those rocks that you have been gathering up to this point.
There are quite a few margoyles behind that door. One good thing to try is to weigh down the 4 plates at the corners and then stand on the middle plate. This opens the door. As soon as a margoyle appears through the door, step away from the middle plate and the door will close. This will ensure that you only have to fight one margoyle at a time, which makes the "fight and move" tactic much more effective. Repeat this until no more margoyle appears. Weigh down the middle plate with another rock to keep the door permanently open and enter it.
There is a secret button at (10) that opens up the passage to the north. Pick up 3 iron potions and another spider key at (11). At (12) is a stone portal similar to the one seen on the cleric barracks level. At (13) there are a mage scroll of Haste, a +1 robe and an amulet. Go south through the secret passage again then go through the illusion wall at the SW corner and another one to the north.
There are lots of items to get in this room. Push the secret button at (14) to reveal the western passage. Pick up a long bow, 8 arrows and a +3 cloak "Moonshade". At (16) there are an axe, a glass sphere (shoots 1 Fireball), a spider key and a stone gem. At (17) there are a potion of healing, a potion of extra healing, 2 arrows, a glass sphere and a Dark Moon key.
The stone gem can be used with the stone portal at (12). Click the stone gem on the portal and your entire party will be teleported to the portal on the cleric barracks level where you can rest. To return, simply click the stone gem on that portal. Now that we have the ability to rest and recover lost hit points and spell, we can explore the rest of the underground much more leisurely.
Use the map to go to (18) at the NW corner of the level. Use the spider key in the keyhole to open the west door. Take the stairs labelled P down to Underground 5.

Level 5 is the lowest underground level. This is a rather small level and the only out is through the set of stairs labelled P. Resting is also not allowed on this level. Huge ants are the enemies on this level, but they are far weaker than the margoyles.
There are no puzzles or secrets to fathom on this level. I'll just highlight the locations of the various loots and items. At (1) there are a silver key, a rock, 2 femurs and 2 skulls. At (2) there are a +2 "Sa Shull" dagger, a femur, a skull and 2 rocks. At (3) there are 2 femurs.
Be sure to pick up the west wind horn at (4). Here you'll also find leather boots, +1 long sword, helmet, platemail and potion of Cure Poison. There are many items lying on the floor at locations (5) through (9). You'll find a skull, a helmet, a long sword, chain mail, a dagger, a Dark Moon key, 2 femurs, a shield, leather boots, 2 more daggers and 3 darts.
Once you have gathered as much as you want, return to Underground Level 4 again via the stairs P.
From the stairs labelled P, go south to location (3). Push the button on the south door to open it. The pressure plate at (19) opens the south door. There are a skull and a +1 staff at (20). You should save the game at this point.
As soon as you try to pick up any of the items at (21), the two secret eastern passages will open while at the same time, the door will close. And you will be surround by about half a dozen margoyles. The fight is tough but certainly not impossible, even for a low level party. The items at (21) are a cursed sword "Hath Kull", a +5 bracer of Protection and a +1 shield. There is a button on the east wall at (22) which opens the door again.
The spider keyhole at (23) opens the door leading to the stone portal room. The doors at (24) and (25) are opened by pushing the buttons on the doors. There is nothing behind either door. When you step on (26) the first time, the door will close on you. But it can be reopened by pushing the button on the door.
There is a button on the north wall at (27) that turns off all 4 spinners that are shown on the map. It doesn't seem to serve any other purpose. The doors at (28) through (32) can all be opened by pushing the door buttons. There is a secret button at (33) that opens up the passage east. Another button at (34) opens up the northern passage. You will fight a margoyle here (35) that will get you a grey key.
Use the two Dark Moon keys in the keyholes at (36) and (37). A spider key will work with the lock at (38) and open up the door to the north. Be sure to check out the alcove to the east at (39) and pick up the South Wind horn and another Dark Moon key. Take the stairs M. At (40), use the grey key in the keyhole to reveal a hidden alcove. You will find a mage scroll of Fireball, a mage scroll of Shocking Grasp, a mage scroll of Detect Magic and a cleric scroll of Raise Dead. Take the stairs L to Underground Level 3.
Once you emerge from the stairs L, follow the very short hallway to Stairs K, which lead to Underground Level 2.
From the stairs K, go west and take the stairs J. When you arrive at the other end, you will see a few weapons lying on the ground at (8). _All_ these weapons are cursed! They are: -2 dagger "Vargon", -3 long sword, -2 mace "thumper".
At (9) you will find another keyhole where your last Dark Moon key will fit. This opens up the southern passage which will lead you to Stairs H that return to Underground Level 1. Watch out for spiders.
Use the map to navigate from Stairs H to Stairs C. These are the stairs that return to the ground level of the temple itself. Your underground sojourn is complete but there is still a lot of game to go through.
Stand in front of the 4-wind carving at (4). Use the 4 horns in succession. (You do this by putting each horn in a character's hand and then _right_ click.) The carving disappears, revealing a northern passage that leads to stairs E. We now begin our ascent to the 4-wind Tower.
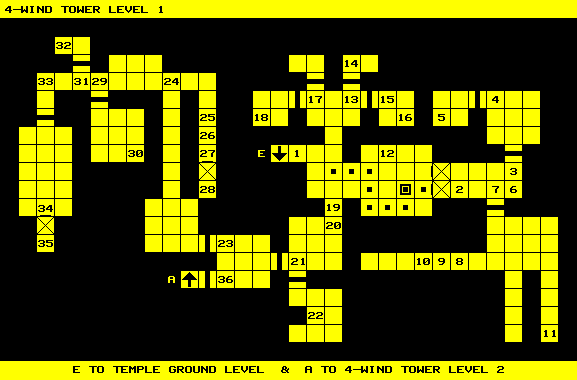
As soon as you come out of Stairs E, you will be greeted with a vision that informs you about the Test of Faith. To the east is an area covered with circular plates. Some plates are lit with a steady blue light. The light moves over the rest of the plates following specific patterns. Anytime you are on a plate that's lit, you lose a big chunk of your hit points. A low level character will only be able to withstand two to three zaps.
The optimum path to take to go through this area was outlined on the map. Stand just to the west of the first tile. Be sure everyone is well rested. Open your mage spell book to your favorite offensive spell. (You will have a very tough fight at the other end.) Also be sure to have a cleric spells of Remove Paralysis ready. Needless to say, you should also have a saved game at this point just in case.
Wait till the light hits the tile just to the east. As soon as the light moves away, start your jog to the east. Make your moves in sync with the movement of the light beam. Whenever you have to change direction, turn and face the new direction instead of sidestepping. More than likely, you will get zapped once before you reach the final tile. The tile marked with a dot enclosed in a rectangle opens the passages to the east.
More than likely, your way east will be blocked by a Mantis Warrior as you reach the last plate. Very quickly cast your offensive mage spell and use your front 2 fighters to overwhelm the mantis. As soon as it is destroyed, step forward to move away from the plate. Your trouble is not yet over. You must defeat the 3 or 4 Mantis Warriors waiting for you. Most mage spells such as Fireballs, Lightning, Magic Missiles etc. work well against them. When you defeat them, you will find a bone key and a dagger for your effort.
Use the bone key in the keyhole at (3) to open the north door. The door at (4) is opened by pushing the button on the door. There is an egg at (5). A Mantis Warrior emerges from the egg if you swing your weapon at it. At (6) is a lever. Push it to turn off the moving light beam. This will make your return trip much easier.
Push the button on the door at (7) to open it. The plaques at (8) and (10) both contain cryptic messages subject to various interpretations. Put something worthless (a rock or a skull) in the triangular alcove at (9) and it will turn into a wand of lightning. This only works once.
At the very south end of the eastern hallway (11) is a -2 cursed long sword "Hunger". Take it and put it in inventory. Be careful not to equip any character with this sword.
Follow the same path to return to the area near the stairs. As a point of interest: at location (12) is a -2 cursed axe. There is no reason to get that and the tile it is on is still illuminated by the lethal light anyway.
At (13) push the button on the north door to open it. You'll find a wounded Mantis at (14). You have the option of healing or attacking it. If you heal it, it will wind up attacking you. Either way, the result is the same. You must kill it and receive a mantis key in return. Again at (13) push the button on the east door to open it. You will find a prisoner there who will ask to join your party. This is Tanglor, a level 7 half-elven fighter/cleric. Decide for yourself if you want him in your party. Incidentally, this is the last character you will find in this game that can join your party. At (16) is a +1 short sword and a +1 shield.
At (17) both the north and west doors can be opened by pushing the buttons on them. There is a +1 polearm at (18).
At (19) there is yet another lit plate. There is no avoiding this one. Walk across it and take the damage. At (20) you will be ambushed by a mantis warrior. It helps when you know it's coming. The south door at (21) can be forced open. Inside you will find a magic mouth at (22). The hint it has is plain enough. Feed it three femurs and it will give you a bone key.
Push the button on the west door at (21) to open it. Use the mantis key in the keyhole at (23) to open the door. At (24) you will be told that some mantis warriors just threw a glass sphere at you. As soon as the scene changes, sidestep to the left. You should be able to easily avoid getting hit by the glass sphere (fireball).
At (25) you will see a pit two tiles away at (27). You should also notice that there is a button on the south wall behind the pit. Throw a rock at the south wall. It will hit the button and the south wall as well as the pit at (27) will both disappear. However, a new pit now appears at (26). Push the button on the east wall at (25) to fill in this new pit. It is now safe to go south all the way to the end of the corridor. You will find a mantis key and the rock that you threw at (28).
Push the button on the door at (29) to open it. There are a mage scroll of Dispel Magic and a mage scroll of Blur at (30). Push the button on the door at (31) to open it. There is an iron ration at (32).
Use the mantis key in the keyhole at (33) to open the door to the south. This is a room full of mantis eggs. You have to swing your weapon at the eggs one at a time and defeat each mantis warriors that emerge from each egg. If you don't do this, you will be ambushed by several warriors when you get to the south end of the room.
Take the green gem from the carving at (34) and then put the gem back in the carving again. This opens up the secret passage south. At (35) pick up a Mantis idol, a glass sphere and a copper key.
Retrace your steps to (36). Use the copper key in the keyhole to open the west door. Take the stairs A to 4-Wind Tower Level 2.

This level is inhabited by wasps, lots and lots of wasps. They are not very strong, but they are fast. And their sting can be poisonous and may cause paralysis as well. After climbing the stairs A, the best way to travel is to go all the way to the west and then turn south, hugging the west walls whenever possible until you reach location (1). Here you will find a Cure Poison potion, a femur and a copper key. If you turn north at this location, you will see a lot of wasps hovering 2 to 3 squares away. At your leisure, cast long range mage spells such as fireballs, lightning bolts and cones of cold. The wasps are very susceptible to these spells and you should have no trouble killing them all.
Return to (2) and use a bone key in the keyhole to open the south door. At (3) is a pressure plate the function of which will not be immediately obvious. In the next room there are 4 levers (5), (6), (7), (8). These 4 levers open the next 4 gates shown on the map. Each lever also opens a pit at the location of one of the other 3 levers. The pressure plate at (3) that you saw earlier reset all 4 levers.
Push the levers in the following sequence: start with (5) which also opens a pit at (8); next push (6) which also opens a pit at (5); then push (7) which also opens a pit at (6). At this point, trying to push the lever at (8) will result in your entire party falling through the pit.
You will have noticed, however, that the first 3 gates through the southern hallway are now open. Moving through this hallway, your party will tell you about a loose brick at (9). Examine the lower portion of the west wall panel at (9) and you will notice that the middle brick is sticking out farther than the rest. Push this brick back in.
Now return to the four lever room. Boldly and confidently step up to (8) to push the final lever. Surprise. You didn't fall through the pits this time. You have just passed the Test of Faith. Pushing the lever at (8) opens up the last gate. You can now travel through the hallway without restriction. There is nothing of interest in this area.
Use a copper key at (10) to open the east door. At (11) you will see another vision. I hope you have better luck in interpreting the meaning of his message. I didn't understand him at all. Both doors behind the vision can be easily opened by pushing buttons on the door. Teleporter 2 returns you to the stairs, after doing some major damage to some of your characters.
Teleporter 1 takes you to a short hallway where you will find stairs labelled B going up to 4-wind Tower Level 3.
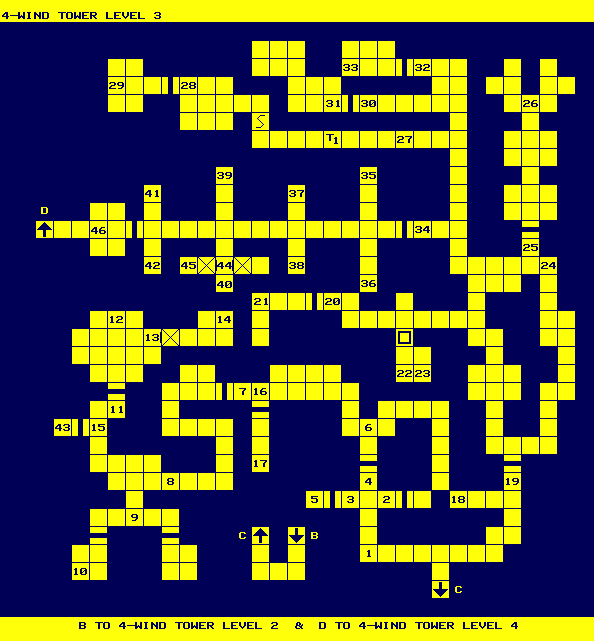
After coming up Stairs B from level 2, follow the hallway to Stairs C. Take Stairs C to the main level. Turn left from the stairs to (1). The plaque here advises using corridor II as the way through. (2) has a plaque that says "I", (3) has a plaque that says "III" and (4) has a plaque that says "II". If you do not listen to the advice and push the buttons to open doors (I) and (III), you will find a Gas Spore (they resemble the beholders but are much weaker, just remember to use long range spells and weapons. Avoid melee whenever possible.) behind (I) and get hit by a fireball at (5).
Push the button on the door at (4) to open it. At (6) there is a magic mouth that tells you about other magic mouths. Be sure to sidestep to the right or left as soon as it finishes talking. It has a tendency to spit out fireballs at you. Push the button on the door at (7) to open the west door. You'll find some flying snakes to fight at (8) and get a Dark Moon key when you win.
You will see a vision at (9) that tells you to choose a door. The door to the west is the right one. After pushing the button on the door to open it, you will find a bone key at (10). On the other hand, if you choose the east door, you get admonished that you made a wrong choice, but you also get a bone key and get teleported to (19). Thus the choice really has no effect in the game. Note that after a choice has been made, the other room disappears.
Push the button on the door at (11) to open it. The triangular alcove at (12) contains 5 potions of Cure Poison and a cleric scroll of Raise Dead. There is a secret button on the east wall at (13) which opens the passage to the east. At (14) you will find a +2 banded armor, a +3 short sword, leather boots and a -2 cursed polearm "Leech".
On the way back, note that the door at (15) has no keyhole or button. The door is closed at the moment. The south door at (16) can be forced open. You will find a couple packages of rotten ration at (17). If you don't have any in your inventory, pick one up. At (18) is another magic mouth, as well as a skull and a femur. This mouth does not have any important information to impart.
Use the bone key in the keyhole at (19) to open the north door. You'll find a few more Gas Spores in this area. Push the button on the door at (20) to open it. At (21) you will find someone who failed at the Test of the Cloth (strangely enough, your party doesn't appear to have to pass that test.) Leave him alone and do not attack him. If you try to attack him, the door will close and I never found a way out of there.
Go through the illusion wall to (22) where you will find a plaque that talks about greed. At (23) is a triangular alcove. Any item that you put here will be turned into a rock. Check and see if you have 5 rocks in your inventory. If not, put some worthless items in the alcove until you are carrying 5 rocks. They will come in handy very shortly.
At (24) you will find some flying snakes to fight and a ring of adornment when you win. Use the Dark Moon key in the keyhole at (25) to open the north door. At (26) you will find a potion of extra healing, a composite bow, 5 arrows and a parchment showing a bunch of illusion walls on a level that you have not seen yet. Since you are using the maps and this walkthru, you don't really need the parchment, but carry it around for the time being anyway.
Go to location (27) and check out the north wall carefully. The middle brick at the bottom of the north wall panel is loose. Pull it out. This deactivates the teleport T1 4 spaces west. If you do not deactivate this teleport, it will keep moving you back (invisibly) to (27), the net effect is that the corridor would appear endless. Beware of the spinner shown on the map when you are on your way to location (28). Push the button on the door at (28) to open it. There is a potion of vitality in the alcove at (29).
At (30) push the button on the door to open it. You will find a few flying snakes to fight behind that door. Don't forget to pick up the Dark Moon key at (31) after you beat up on the snakes. Push the button on the door at (32) to open it. Pick up the mage scroll of Disintegrate at (33).
Use the Dark Moon key in the keyhole at (34) to open the west door. At (35) feed a rotten ration to the mouth. At (36) put 5 rocks in the mouth. Give the mantis idol to the mouth at (37). You don't have what the mouth at (38) wants yet, so we will skip that for the moment.
At (39) there is a closed mouth. The purpose of this mouth will become obvious only if you need to make a return trip to this level for some reason. Give the cursed sword "Hunger" to the mouth at (40). The mouth at (41) takes a potion while the one at (42) will take either a scroll or a parchment. (The map you picked up earlier would be a good choice.)
Use the map and retrace your step all the way west to location (15). This is the door that you noticed earlier without a keyhole or a button. When you get there this time, you will notice that the door is open. Feeding the mantis idol to the mouth at (37) opened it. Behind the door you will find a red gem at (43).
Return to the corridor of mouths and feed the red gem to the mouth at (38). Once that's done the door at the west end of the corridor will open. But before entering the door, stop by location (44). Swing your weapon at the west wall. This opens up the secret passage on both side. You will find another mage scroll of Disintegrate at (45).
Enter the door at the west end of the corridor of the mouths. You will meet DRAN for the first time at (46). The door closes on you. The only way you can go is to take the stairs labelled D up to the next level, 4-wind Tower Level 4.
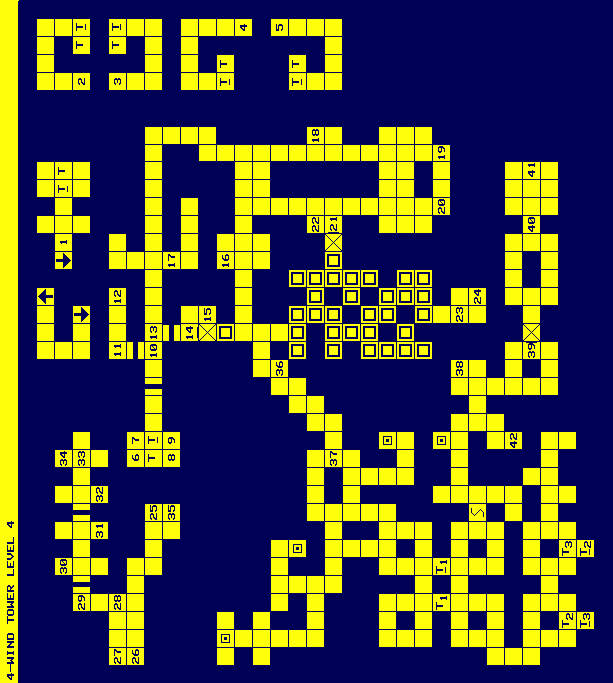
After climbing the stairs labelled D, following the short hallway to stairs E. At (1) is a plaque that tells you about gathering 4 keys for the upcoming door. Continue to the east you will find teleport T. This teleport connects with 5 other teleports, 4 that lead to a Dark Moon key each, and 1 that leads to a door with 4 keyholes. Each time you step into any one of these 6 teleports, you will be randomly teleported to any one of the 6 destinations. You must use the teleports until you have gathered all 4 Dark Moon keys from Locations (2), (3), (4) and (5).
After you have gathered 4 Dark Moon keys, enter the teleports until you wind up in the room with the 4 keyholes. You are now on the main level of level 4. Use all 4 keys in the keyholes at (6), (7), (8) and (9). This opens the door to the east. You should save the game at this point.
A word of warning is in order here. This level contains the toughest enemies you have yet to meet in the game. The Will O' Wisps have lots of hit points, are very hard to hit and their blows pack a wallop when they connect. The beholders are even tougher. Their Death and Disintegrate spells can wipe out your entire party in just a couple of rounds. Fortunately, they do not regenerate. Be sure to save your game each time you win a battle.
Never go toe to toe with the beholders. Even when you don't have room to sidestep, back up after swinging your weapon(s). Keep some distance from the beholder so that you have time to out run its spells. Continue to back up until you reach a corner, then turn and wait in ambush. Repeat this tactic as often as possible. I did not find any spells especially useful on the beholders. The old standbys such as Fireball, Magic Missile, Cone of Cold, etc did not faze them at all. Neither did the cleric spell of Slay Living. You are probably better off casting the mage spell of Haste and then just hacking and slashing your way through.
At (10) the north door can be opened by pushing the button on it. You will find the first beholder just behind the door at (11). Use the tactic I outlined above, but lure it towards the west. If you get stuck, you can step into the teleport and get some temporary relief. Just be prepared when you return. The beholder will be waiting for you. Defeating this beholder will yield a femur, but you don't need any more of that. Leave it there if your inventory is getting full. At (12) is another femur.
When you step on (13), the door to the south will open automatically, and you will have to fight another beholder. Again, lure it towards the west. After defeating this beholder, check out the south wall panel at (14). The middle brick can be moved. Doing so will open up the southern passage. There are 3 potions of healing at (15). Go through the illusion wall and find a regular dagger and a femur at (16).
There is one more beholder hiding at (17). You don't _have to_ fight this one, but that's the reason why you didn't want to lure the first two in this direction. You would wind up having 2 beholders to contend with at the same time.
A plaque at (18) indicates that this is a safe place to rest to recover hit points and spells. Beware of locations (19) and (20). There are pressure plates at these locations that trigger fireballs. You will find a Will O' Wisp near this area which will try to lure you to step on the plates. Just avoid it.
Check out the west wall at (21). There is a button at the bottom corner of the right edge of the wall panel. Push it to reveal the western passage. At (22) is another plaque indicating that this is another safe alcove. Use the map to navigate through all the illusion walls until you arrive at location (23). Here you encounter a beholder stuck in a hole in the ceiling. It does not matter what option you choose here. The result is the same. Save the game here first.
Push the button on the south wall to get lifted to the beholder sublevel. You will find the previously stuck beholder waiting for you at (25). Fight-and-sidestep should easily take care of it. (Don't worry about stepping over the pit. This is one pit you won't fall into.) At (26) there are a +2 halberd, a +3 shield and a +2 green crystal hammer. At (27) you will find a potion of healing, leather boots, 2 daggers and a staff. At (28) there are a -2 cursed bracer of protection and 2 femurs.
The green crystal hammer is the only item you must get on this sublevel. You may descend to the main level at this point. But if you wish to explore the rest of the level for more battles and more experience points, push the button on the east door at (29) to open it. You'll find 2 more beholders wandering around behind the door. At (30) there are 1 iron ration, 1 rotten food and 1 femur; at (31) a mace and a mage scroll of Fireball; a +4 dragon armor and a +2 short sword at (32). When you step on (33), you will be turned to the north where there is one last beholder waiting for you. Sidestep to the left quickly and then deal with it using the familiar tactic of retreat and ambush. There are a skull, a femur and a wand of Dispel Magic at (34).
Return to the beholder main level by pushing the button at (35). This will take you back to location (24). Retrace your steps through the illusion walls. At (36) you will received another vision of Khelben. At (37) there is a plaque informing you about the Test of Vision.
A word about the rest of this level that you are about the explore: There are 4 pressure plates in this region. Stepping on these plates causes the dungeon layout to shift and change. As far as I can determine, stepping on these plates do not open up new areas or allow new items to be discovered. They merely serve to slightly alter the geography, enough to cause great confusion during navigation. The map 4WIND4.IFF is correct provided that you do not step on any of these plates, which are marked on the map to alert you.
Also pay special attention to the three hidden teleports T1 through T3 and the spinner. The teleports will move you to the new locations without you noticing, while the spinner will quietly turn you in the opposite direction. As it turns out, the area west of location (37) does not contain anything of interest, although there are a few Will O' Wisps that would add to the experience points.
At location (38) you should find a chain mail, a ring of sustenance and a ration. Look for a button at the lower right corner of the east wall panel at (39). Push it to open the passage east. Someone discovers that you are not of the temple at (40) and you will see two beholders in the room just to the east. Save your game here.
Here you have no choice but to face 2 beholders at the same time. As soon as you take one step east from (40), the 2 beholders will come after you. At the same time, the secret passage that you opened moments ago will be closed _permanently_. If you plan to fight them both, you should at least cast the Cleric spells of Bless and Prayer as well as the mage spell of Haste ahead of time. The key is to kill the first beholder very quickly. If you succeed in doing that without taking a lot of damage to your party, be sure to save the game. You should have little problem finishing off the second beholder using the retreat and ambush tactics.
On the other hand, it is possible to run away from both beholders without a fight. Take a step east from (40) and then immediately retreat. Lure the beholders down either the north or south hallway west of location (40). Do not move too far ahead of the beholders. (If you do, the second beholder will take the other hallway and try to sneak up on you from behind!) Once you lead them to the middle of one of the hallways, turn around and move as quickly as you can through the other hallway, go east past (40) and wind up at (41). Here you will find a pedestal with a hand carving on it. Choose the option of putting your hand on the carving.
What luck! Not only did you escape from the 4-wind Tower Level 4, (you are now back on the Temple of Darkmoon Ground Level GROUND0.IFF, just east of location (3)), but you have also obtained a Mark of the Moon on your hand.
You are now just to the east of location (3). Climb the stairs labelled D to go to the Cleric Barracks Level (BARRACK).

From the stairs D, make your way to location (24). There is a mouth here that will allow you to enter the door to the east only if you bear the mark of the moon. Now that you have touched the hand pedestal and gotten the mark, the door simply disappears.
At (25) is a green shield block further progress to the east. The only thing that will break it is the green crystal hammer. Wield it like a weapon and swing it at the shield. The area to the east changes its layout slightly as you explore it. The shaded tiles on the map represent walls that shift in and out of existence. There is really nothing of interest in this area. The only important feature is the set of stairs labelled A which leads to level 1 of another tower.
For those who are thorough, there is a group of 4 clerics waiting for you at (26). You will find a plate mail after the battle. At (27) there is a niche. Put an item in it to open the secret passage west. Going through this passage to location (28), you will find a secret button on the west wall. Push the button to reveal more of the passage. (Note: the only time you find the secret button is when you go west from location (27).)
Take the stairs A to the Mark of the Moon Tower Level 1.
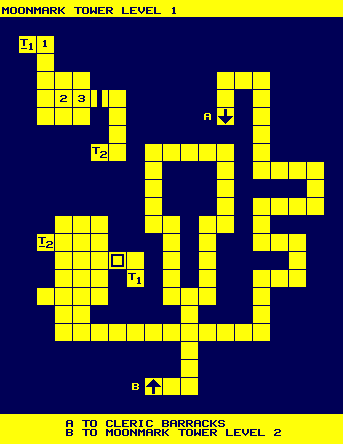
This level is very small and uninhabited. From Stairs A, follow the corridor all the way to the west. Go through the illusion wall and enter teleporter T1. At (1) push the button on the door to open it. Pick up the polished shield and a mage scroll of Hold Monster at (2). Push the button on the door at (3) to open it. Enter teleporter T2. That all there is to do on this level. Use Stairs B to go up to level 2.
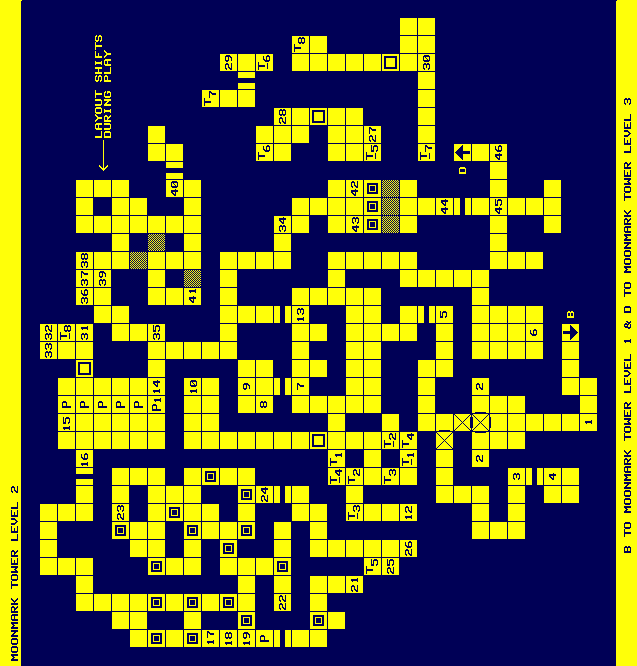
The plaque at (1) near Stairs B provides the clue as to how to open up the rest of the level. Stand in front of either one of the carvings at (2) and cast the cleric spell of Dispel Magic at the carving. The wall in the middle disappears. Cast the spell again at the carving and the northern passage opens. Cast the spell a third time to reveal the western passage slightly to the north. The door at (3) can be opened by pushing the button on the door.
The character Alain at (4) has a short but interesting story to tell. More importantly, he awards enough experience points to raise the character of your choice by 1 level. To get his award, allow the character that you choose to be touched by Alain when the option appears.
Note that this is a one time only event. In order to achieve maximum benefit, you should take a look at the statistics of the character you want to advance. If the character is only lacking a small amount of experience points to advance to the next level, you should hold off visiting Alain until your character has advanced. Returning to Alain then would then gain your character an extra level instantly.
Push the button on the door at (5) to open it. Go east and watch out for the 2 clusters of moving pits. It is not difficult to get past them. Grab the soul gem at (6). Retrace your steps past the pits and open the door at (7) by pushing the button on it. The plaque at (8) is pretty clear about what needs to be done here. Put the soul gem in the ornament at (9).
Go through the illusion wall a little bit to the west and pick up the body gem at (10). Enter the teleporter T3 which allows you to pick up the heart gem at (12). Enter the teleporter T2 and then return to (9) and place the body and heart gems in the ornament. This opens the door at (13).
At (14) you will find a row of 6 pits blocking your way west. Push the button on the wall at (14) and wait there. Soon the pit P1 will be filled. Move across it quickly. You will be greeted by a bulette here, which should not be difficult to defeat.
The pressure plate at (15) is responsible for filling the pit P1 when it is weighed down. Put a rock or a bone on the plate to keep P1 filled. What happened was that a bulette was generated when you pushed the button at (14). When it randomly stepped on the plate at (15), the pit P1 was filled in allowing you to cross safely.
Push the button on the door at (16) to open it. The corridor leads to 2 separate hallways going south. You will notice that there are pressure plates along both hallways. These plates trigger fireballs which can be avoided but only if you take the proper route.
Take the western hallway. Stand on the tile just north of the first pressure plate. Turn around so that you are facing north. Move backwards 6 spaces. (A fireball will fire at you when you take the first step. You will see it coming from the north. As long as you stay in front of it, it cannot hit you.) Then, immediately and without turning, move to the east (right) 2 spaces and then north (forward) 1 space. Wait here a few seconds to make sure that all the fireballs you triggered have disappeared.
Move south (backwards) 1 space, west (left) 2 spaces and then north (forward) 2 spaces. You are now at location (17) on the map. There is a lever here on the west wall. Push this lever. You should rest and save the game here.
Push the lever at (18). This combination of levers opens the door to the south. Quickly go south and enter the door. You will find a bulette in this room. There is also a pressure plate here as shown on the map. The bulette may randomly step on this plate. If you it gets to the plate before you, you will get hit by a fireball triggered from the south. This one is unavoidable, but it is subject to the random movement of the bulette. Defeat the bulette and pick up a shell key and a mage scroll of Improved Invisibility.
Return to (19) and face east. The pressure plate in front of you triggers a fireball from the east as well as opens a bit just south of (19). Avoiding the fireball is relatively easy. Go east (forward) 2 spaces and north (left) 1 space. Wait a second or two and then go to location (22). Pick up the very important crimson key just lying on the ground.
There are many more pressure plates at the north eastern part of this maze. But all of them are either duds or they trigger fireballs that go off in other directions rather than aimed right at you. It is actually rather safe, except for a bulette or two to explore this portion of the maze. Be sure to pick up the polished shield at (23).
Use the shell key in the keyhole at (24) to open the door. Click on the mouth at (25) to learn of its challenge. Rest here to recover all hit points and spells. Check everyone's inventory carefully and drop any extra spellbooks and cleric holy symbols at location (26). Cast the cleric spells of Create Food, Bless and Prayer and the mage spell of Haste if you have them. You should save the game here.
Right click the mage's spellbook and select the level of spells you may want to use during the challenge. I found the level 5 Cone Of Cold spell very effective. Once you have the spellbook menu at the right page, drop the book as well as any equipped holy symbol at location (26). (Notice that the spell menu stays on the screen even without the spellbook! It will disappear as soon as you CAMP, however.)
Enter the teleporter T5. As soon as you are teleported, you will face a group of 3 or 4 bulettes at(27). You need to kill the first two as quickly as possible with magic to avoid getting surrounded on two sides. This is where the Cone Of Cold really comes in handy. Use the fight-sidestep tactic to deal with the last one to avoid taking any unnecessary damage.
Go through the illusion wall to the north, read the plaque at (28) and enter the teleporter T6. Read the plaque at (29). The transparent wall blocking your way to the west can be destroyed by repeat hacking and slashing. The catch is that each time you hit the wall, your entire party will also take damage. Rest as often and as long as needed to recover hit points. (Characters will still recover hit points even without curing spells from clerics, but at a very slow rate.) The wall takes a random number of hits to destroy. Be sure to rest again after destroying the wall to return everyone to full strength. You should also save the game here.
Step into the teleporter T7. As soon as you arrive at the destination, you will be greeted by one final battle. This final monster is not even described in the Bestiary. It looks a little bit like the Mind Flayer and is not that difficult to defeat. Be sure to pick up the Eye of Talon at (30). Go through the illusion wall to the north and step into the teleporter T8 which returns you to a secret room just east of the row of pits before the fireball maze on the main level.
The plaque at (31) acknowledges the fact that you have beaten the challenge. Pick up the polished shield at (32) and all the spellbooks and holy symbols that you previously left behind at (33). Go through the illusion wall to the west then travel south east. There is a plaque at (34) that informs you that this is the SENTRY area. You will have to fight a bulette around this area and receive a crystal key after the battle. Use the crystal key in the keyhole at (35) to open the door to the north.
Locations (36), (37) and (38) are three levers. On the south wall at (39) is a button. Every time you move the levers to a different combination and then push the button at (39), the layout of the area to the south east changes! The objective here is to get to the object protected by transparent walls. Go right ahead if you wish to experiment.
The combination that will work is: (36) down; (37) down; (38) up. Push the button at (39). The layout of the area will now match _exactly_ with that shown on the map. The object of interest is at location (41). It is an amulet of life. Get it and then leave. The door at (40) can be open/closed by a button on the north floor. There is a pressure plate behind the door and apparently bulettes are continuously being generated right in the area also. But other than that, I did not notice any other effect from the pressure plate.
Retrace your steps and return to the SENTRY area. There are 6 pressure plates here and a wall that moves sideways (east/west) when you step on the plates. You will find that no matter which plate you start on, the wall will always be right in front of you blocking you way south when you get to the front row.
Stand on the plate at (42) and throw either rocks or bones at the plate at (43) until the wall moves completely to the west side. Moving south now from location (42) will get you past the wall. At location (44) there is a smooth hole on the west wall. Put your Eye of Talon in the hole _and_ then remove it. The door to the south will open. (Be sure to put the Eye back in your inventory. You will need it again later.)
There is a pressure plate at (45). Stepping on this plate summons three bulettes and at the same time, closes the door you just came through. As long as you take care not to get surrounded by the bulettes, the fight should not be too big a problem for your party. The button on the east wall at location (46) reopens the door behind (44). Take the stairs labelled D up to Level 3.
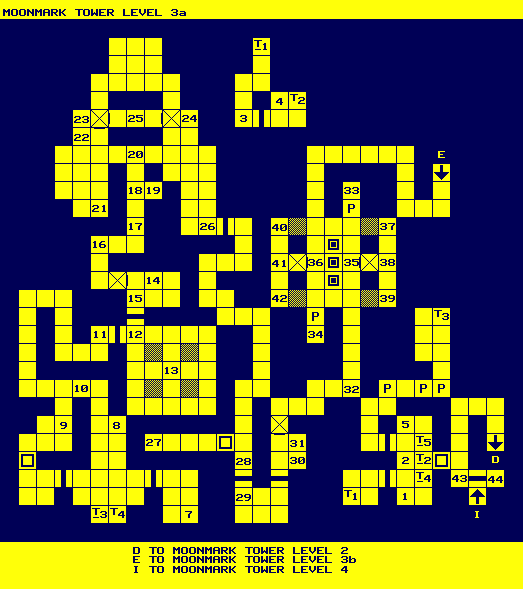
Follow the hallway from Stairs D and go through the illusion wall to the room to the west. The plaques at (1) and (5) indicate where the doors lead to. Push the button at (2) to open the door to the south. (I never did quite figure out the functions of the three pressure plates.) Enter the open door and then the teleporter T1.
The door at (3) has a button. Push it to open the door. Pick up the shell key on the floor at (4). Enter the teleporter T2 which will bring you back to (2) again. Push the button at (2). This time the door to the north will open. (As far as I can tell, the north door only opens after you have been through teleporters T1 and T2.)
Beware of the pits along the E/W corridor. They are not difficult to avoid when you discover that the second tile from the west is always solid. Enter the teleporter T3.
When you arrive at the destination, you will immediately notice the guards to the north. They will not attack unless you attack first. To the east is teleporter T4 that will bring you back to (2) again. Use it only in an emergency. Rest here to recover all hit points and spells. Cast the mage spell of Haste. Save the game.
When you approach the guards, you will be warned. In order to go any further on this level, you have no choice but to attack them. And as soon as you do that, the doors to the east and west will open, and more guards will appear. The best place for you to be is just to the west of T4. Here you don't have to worry about getting surrounded by the guards.
I found that the mage spells of Fireball and Magic Missile worked well on the guards while Cone Of Cold and Lightning Bolt did not. After destroying the guards, be sure to check the floor for a crystal key dropped by one of them. Enter the door to the east and pick up a polished shield.
There is keyhole at (8) that will take the shell key to open the north door, but there is no need to use a shell key here, since there is another way to get behind that door. Go through the door to the west and go through the northern illusionary wall. There are a few more guards to kill in this room. Push the button at (9) to open the door.
There is a mouth on the south wall at (10) that will try to summon more guards as you walk by, but most likely none will appear since you should have wiped out most of them by now. At (11) there is a large pentagram on the floor. When you step on it, you get zapped by a jolt of lightning or electricity and at the same time the door to the east opens. I never found away to avoid getting hit when I stepped on the pentagram.
The pressure plate at (12) closes the west door when you step on it. And when you step off the pressure plate, the north door opens. You will also find another pressure plate in the middle of this 5X5 room weighed down by a pair of +1 Brahma boots and a mage scroll of Ice Storm. It's ok to take one of the items. But if you try to take both off of the pressure plate, walls will appear in the four shaded areas and unavoidable fireballs will shoot at you from at least 2 different directions. It's best to leave one item on the plate. Neither one is crucial in the game.
Enter the room behind the north door. At (14) one of your characters will tell you that the room has a secret button. Examine the west wall at (15). The middle lower brick is different from the others. Pushing this brick will reveal the secret passage to the east. There is a plaque with a somewhat cryptic message at (16).
Rest in front of the door at (17) to recover all hit points and spells. You may want to save the game here also. Push the button on the door to open it. At (18) there is a pressure plate on the floor and a button on the west wall. When the pressure plate is stepped on, it triggers fireballs from the south wall outside the door. The button on the west wall closes the door.
When you enter the door and steps on the plate at (18) the first time, you should be prepared and push the button on the wall to close the door to block off the fireballs. At (20) is another plate that also triggers the fireballs from outside the door. This area is full of guards. (About a dozen of them!) I found that the best tactic to use is to lure them into this hallway, then push the button at (18) to open the door and quickly back up to (19). In order to get to you, the guards have to step on the pressure plate. Thus your attacks are aided by a unlimited source of fireballs.
When you do not see any more guards approaching in the hallway, step up to (18) and push the button to close the door. Venture north to (20) and peek into the rooms to the east and then west. If you find more guards in there, again lure them to (18) and repeat the process until you clean them all out.
At (21) there is another polished shield to be picked up. There is a lever at (22). Pushing this lever will open up the secret passages at (23) and (24). It will also reveal close to another bunch of guards that can have you surrounded in a very short time if you try to fight them in this area. Again, best strategy is to return to (18) and (19) and use the fireballs to your advantage.
When this final batch of guards have been taken care of, return to location (23). You will notice that the east wall is transparent. Swing your weapon at the transparent wall. A few hacks should be enough to break it down. At (25) is the Starfire wand. The transparent wall at the other end (24) can be similarly destroyed. There is a familiar looking hole on the south wall at (26). Put the Starfire in the hole and then remove it. This opens the door to the east.
Follow the winding hallway south. Go through the illusionary wall to the west. Here you will find another polished shield, a +2 Jhona's cloak and a parchment map at (27). At (28) you will see a rather suspicious vision of Khelben telling you that in order to succeed in your mission, you must let the guards in the next room kill you. Your suspicion will be confirmed if you pick up the amulet of resurrection he left for you, for this turns out to be a cursed item.
Push the button on the east wall at (28) to open the door. There is a pressure plate at (29) that closes the door. A button on the west wall at (29) opens the door at the NE corner. There are several guards to fight after you open that door. One of them will leave a tooth key. At (30) there is a +1 sling. Use the tooth key in the creature skull at (31) to open the secret passage north. You will also see a vision of Dran here.
Pick up the rock at (32). There are 5 pressure plates in the center of the next room. The plates at (35) and (36) cause a teleporter to appear either at location (33) or (34). There are also pressure plates at locations (37) through (42) which are separated from the main room by transparent walls.
The idea here is to weigh down the six plates (37) through (42) with various objects. When you do that, the door at the NW corner will open, allowing further access. First step on the plate at (35) to move the teleporter at (33). Next, step on the first (north) plate in the center column and then walk to just south of the pit in front of the teleporter at (33). Throw an item at the teleporter. Now if you turn east and look beyond the transparent wall, you will find that the item you just threw landed on the pressure plate at (37).
Repeat the procedure by stepping on the second and third plates in the center column and throwing other objects at the teleporter. These objects should land on the plates at (38) and (39).
Now move the teleporter to location (34) by stepping on the plate at (36). Use the same procedure to put items on the plates at (40), (41) and (42). Once all 6 plates are loaded, the door at the NW corner will open. At the same time, the glass walls leading to (38) and (41) will also disappear, allowing you to step in and retrieve all the items from all 6 pressure plates.
Enter the door and then follow the hallway and take the stairs labelled E to Level 3B.
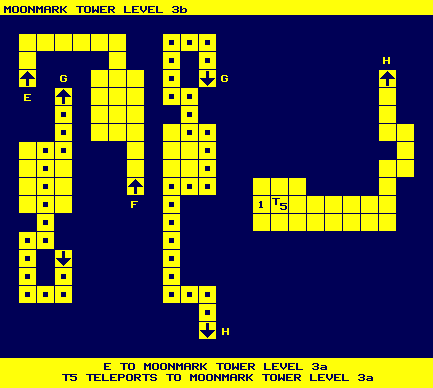
The stairs labelled E leads to a hallway, and then a room, and then another set of stairs labelled F.
Stairs F leads to a room of moving pits. It is not difficult to get to the stairs G on the other side of the room. Just follow the route shown on the map.
Stairs G leads to another room of moving pits. The route to get across this room a bit trickier because it requires several direction changes. I strong recommend that you turn and move forward so that you can always look at the tile in front of you before you step on it. There should be enough time to do that and still avoid falling into a pit. Again, follow the route shown on the map. This will lead you to the stairs labelled H.
The stairs H leads you into a room with a teleporter T5 in the center. Be sure to check out the niche in the west wall at (1) and pick up a ring of feather fall as well as a crystal key. Step into the teleporter T5 to return to Level 3A.
The teleporter T5 on level 3B takes you back to the doors that lead to either a shortcut or the guards and wards areas. Go through the illusionary wall to the east. At (43) use the shell key in the keyhole. At (44) use the crystal key. Using these two keys cause the glass wall to disappear. You are now able to go up the stairs labelled I to Level 4. Be sure to save the game here first. You will have a pretty tough battle as soon as you get to level 4!
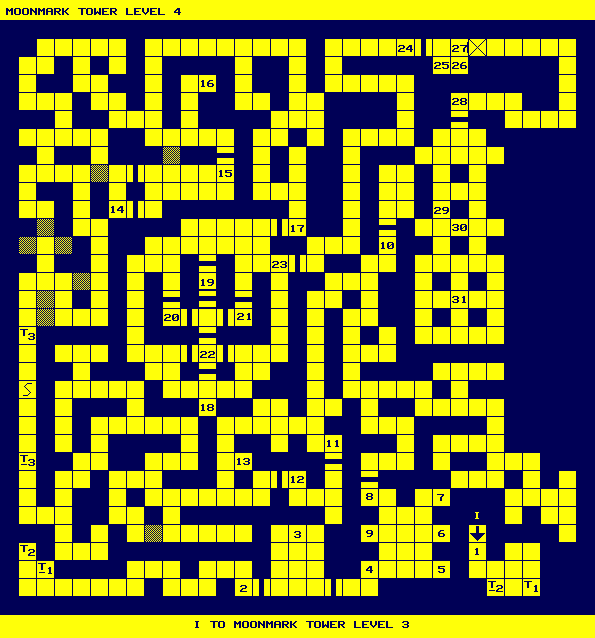
As soon as you reach level 4 via the stairs labelled I, you will have to fight a couple of Aerial Servants. They hit hard and they have lots of hit points themselves. Step into the teleporter T1 which will take you to the main level.
You will have to defeat more Aerial Servants after being teleported. T2 is another teleporter that will take you back to the area near Stairs I. There's not much reason to go back there unless you are desperately in need of a place to rest.
Push the button on the door at (2) to open it. The carving at (3) tells you that you are about the enter the medusa labyrinth. It also tells you the importance of the 6 polished shields, all of which you should have found by now if you follow this walkthru. Tell the carving that you are prepared to enter and it will open the door to the east for you.
Put a polished shield at each of the locations (4) through (9). Doing so will open the door at the NW corner. Before entering this door, be sure to retrieve all 6 shields and give one to each of the 6 characters. It is also a good idea to keep a saved game here.
The medusa labyrinths are inhabited by medusae and Aerial Servants. The medusae are not too tough. They can petrify your characters but not very often. Carrying the polished shields probably help. Once a character is petrified, however, only the high level mage spell of Stone To Flesh or a bag of magic dust can cure him/her. The aerial servants are very tough. You should save the game each time you successfully defeat these monsters.
The labyrinths make up a rather complicated maze. However, there aren't too many locations that need to be visited. Feel free to explore every tile and fight every monster to gain experience points. I will only highlight the important locations.
The door at (10) can be opened by pushing the button on the door. There is nothing interesting behind the door. The doors at (11) and (12) both have buttons. Push them to open the doors.
There is a tooth key at (13). There are also quite a few Aerial Servants lurking around in this neighborhood. Be very wary. The shaded tile is a walkway sometimes, and a wall at other times.
Be alert when you traverse the north/south corridor at the western edge of the dungeon. The spinner turns you around 180 degrees. The hidden teleporter T3 activates only the first time you step in it. It brings you back to near the south end of the corridor. Nothing happens during subsequent visit to T3. All the shaded tiles in this area can change from walkways to walls as you travel.
There is a button on the south wall at (14). Pushing it will open both doors that lead to the east. There are quite a few medusae behind the doors and more than likely, you will get surrounded by a few of them. Push the button on the door at (15) to open it. Pick up the mage scroll of Invisibility 10' Radius and the Stone Dagger at (16). Open the door at (17) by pushing the button on it.
To understand what needs to be done in this area, go to (18) and read the plaque on the wall. There are 4 pressure plates in this area at locations (19) through (22). The idea is to get a medusa to stand on each plate, then closing off the doors leading to that plate, thus trapping the medusa. Once you have done that to all 4 pressure plates, the door at (23) opens, allowing further progress.
Lure a medusa into a plate room by getting in front of her and then walk backwards into a plate room. When she is standing on a plate, cast the cleric spell of Hold Person. This will freeze the medusa motionless for a short period of time. Close the doors leading to the plate and she will be trapped inside. One word of caution, you must leave the plate at (22) till last or you will end up trapping yourself. A little bit of reflection while studying the map and you will understand what I mean.
After trapping a medusa at (19), (20) and (21), close the north and south doors that lead to (22). Use the east and west doors to move through as you lure the last medusa into position. Once you have successfully trapped the 4 medusae, the door at (23) opens.
Push the button on the door at (24) to open it. At (25) are 2 femurs, 2 skulls and the Hilt of Talon. There are a skull, 2 femurs and a mage scroll of Flesh To Stone. At (27) pushing the lower brick on the north wall will open the east passage. Use the tooth key at the creature skull at (28) to open the door to the south.
At (29) click on the royal banner on the east wall then pick up the mage scroll of Cone of Cold at (30). There is a pressure plate at (31). Before stepping on this plate to find out what happens, order your mage(s) to memorize as many level 5 Hold Monsters spells as they can. Then rest to recover hit points and spells. Keep a saved game at this point.
When you step on the pressure plate at (31), you would be surrounded on all 4 sides by transparent walls. You will see Dran who is thrilled to spring this little trap on your party. After some suitable amount of gloating and threats from Dran, the pressure plate opens up into a pit and your party is dropped to the next level, level 5.
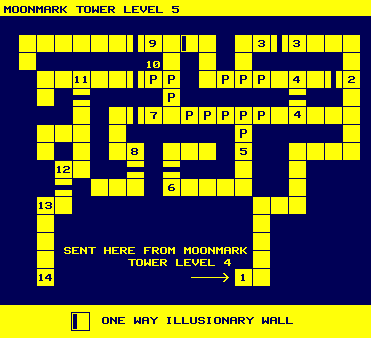
At (1) you find a mage scroll of Cone Of Cold. This level is inhabited by Frost Giants who are terrible monsters because when they strike, they inflict damage on every character in the party with one blow. The beginning of this level is also the toughest. You have to defeat a wave of 3 giants before you can rest, and the next wave has 4 giants.
Fireball and Magic Missile will work against the giants, but I prefer the Hold Monster spell. This works about half of the time. When it works, the giant will stop dead in its tracks, long enough for your two fighters to easily hack him into oblivion if you have the mage spell of Haste running at the same time. I like it because your party will take absolutely no damage this way.
If you wish to use this tactic, cast Haste before you meet the giants head on. Then cast Hold Monster as soon as you are in line with a giant. If the spell doesn't take, simply restore the game until the spell works. And be sure to save after each successful battle. After playing through with two different parties, it seemed to me that the high level the mage was, the more frequently the Hold Monster spell would work.
If you do not have enough Hold Monster spells to take care of the last 1 or 2 giants in the second group of 4, try the fight-backup tactics. There may just be enough room in the narrow hallway for you to beat them without taking damage.
There is a button on the door at (2). Push it to open the door. (You will find giants behind each and every door on this level, so be prepared.) There are 3 moving pits in the hallway behind this door. The pattern is such that it is impossible to get across directly to the west end. You will have to detour to the north after crossing the second pit and then wait for the right moment to finish the journey west. There is nothing of interest at the end of that hallway. I should note also that the illusionary wall shown on the map only allows travelling from west to east, not vice versa. The door at (3) can also be opened by pushing the button on the door, but there is nothing else worthy of note in that area.
The door at (4) can be opened on either side with the push of a button. There are 5 pits in a row along the east/west hallway south of this door. If you try to cross all 5 pits to get to the other side, you will never make it. What you have to do here is to cross the first 2 pits and then turn south until you reach (5). This is quite easy to do.
At (5) you will have to defeat a couple of frost giants. If you wish, push the button on the door at (6) to open it, and fight 2 more giants inside. This will increase your characters' experience points, but little else. When you are done, return to (5). You should save the game here.
From (5), it is quite possible to go across the two pits to the north, and then 3 more to the west. The trick lies in finding the right moment to begin your trek. Study the pattern. You will find that there are really 2 likely opportunities when you can start moving north. One will quickly drop you through one of the pits. Restore and try the other one. And I recommend that you turn to the left when you have to change direction, rather than side-stepping.
The doors at (7) and (8) can be opened by pushing the buttons on the doors. There is nothing behind either door except frost giants. Fight'em or leave'em. Return to (7) and then pick the right moment to cross the two pits to the north. This should very easy to do. There is a frost giant at (9) that you will have to defeat. Again, push the button on the door at (9) to open it and fight more frost giants if you wish. That's entirely up to you. Save your game here.
Study the pattern of the pits and move to location (10) as soon as the pit there is filled. Push the button on the door to open it. If the frost giant behind the door is not right at the doorway, take a step forward to get away from the potential pit. Either way, fight the giant and enter the door as soon as you can. Push the button on the door at (11) to open it. There are 3 more giants here waiting for you. Open the door at (12) the same way after you defeat the 3 giants.
Finally! At (13) you will find a mysterious giant who tells you a story about how Dran tricked the giants a long time ago. Be sure to pick up the Talon's Tongue that he leaves behind. At (14) is a stone portal. Use the Stone Dagger on the portal to return to the Cleric Barracks level.
Using the stone dagger on the portal at the frost giant level (level 5 of the Moonmark Tower) returns you to location (16) on the cleric barracks level. Exit the door to the east and then go south and east a couple of steps. You are now in front of the crimson keyhole at location (29). Use the crimson key in this keyhole to open the door to the south.
At (30) you will find the unique looking wall carving. The rather cryptic message from the frost giant should make some sense here. This is where you have to use all three parts of the talon. Put the eye, the hilt and the tongue of the talon in the carving. This opens up the western passage. Be sure to pick up the +4 talon lying on the floor.
Take the stairs labelled E. The area this takes you to is shown at the north east corner of the map. You will fight a couple of clerics around location (31). One of them will leave a flail which didn't seem to be a particularly good weapon. Pick up the mage scroll of True Seeing at (32). Return to the main level via the stairs labelled E.
Location (33) is pressure plate. Stepping on this plate will trigger fireballs coming at you from the west. Retreat and duck to the south (right) to avoid it. You will see that the plate at (33) is now depressed. Stepping on it a second time returns it to its normal position but does not trigger another fireball. Be careful of the fast moving pit. Getting past it to the Stairs F should not be much of a problem. Take the Stairs F up to the North Talon Tower.
This is a very small single level tower. The only thing tricky about this level is the existence of three hidden teleporters that can be very disorienting to unsuspecting adventurers. Pay special attention to the locations of teleporters T1, T2 and T3 and their destinations shown on the map. Note that there is also a destination for a teleporter T4. This teleporter is in the South Talon Tower that we will get to a little later.
Shortly after leaving Stairs F, you will be teleported by T1. Be prepare to fight a cleric that can hurl some strong fireballs in the area around location (1). Be sure to pick up the crimson ring he leaves behind. There is a triangular wall niche at (2). Anything you place in this niche turns into a glass sphere. You will need three of these spheres later in the game. Check your inventory and use the niche to generate all the spheres that you think you will need.
At (3) there is a lever that turns off the teleporter T1 and at (4) there is a second lever that turns off T2 and T3. Push both levers to turn off all the teleporters. (Note: be careful to avoid T2 when you move from (3) to (4).) Now you can return to the stairs labelled F. Take the stairs back to the cleric barracks level.
After returning via Stairs F, be careful to avoid falling into the fast moving pit just to the east. Also, be sure to move quickly forward and then to the right after stepping on the pressure plate at (33).
When you stand on the pressure plate at (34), you will notice that the hallway extends one more step further to the west. Drop an object here to keep the plate weighed down. When you stand on the plate at (35), the wall on the south side at the end of the hallway disappears. Drop another object to weigh down this plate. After fighting some clerics, take the stairs labelled G up to the South Talon Tower, where Dran is awaiting!
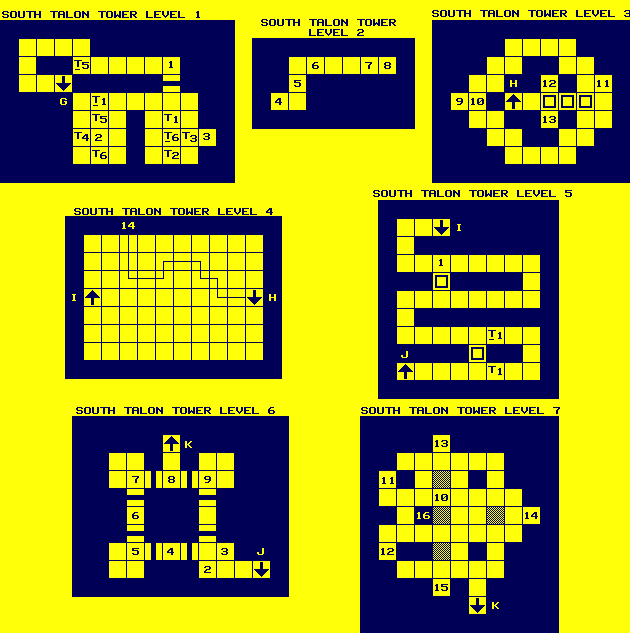
After emerging from Stairs G, follow the corridor to location (1). Click on the banner on the north wall. You will find a crimson ring. Push the button on the door to the south to open it. Inside the room are a series of teleporters. Note that T2 and T3 both teleport to location (2), while T4 will send you all the way over to the NORTH Talon Tower (NTALON&SOFTFLR).
After entering the door at (1), enter teleporter T3. You will find yourself at location (2). There is a parchment of sticky paper here. Pick it up and put it in inventory, but do _not_ equip it. Enter the teleport T6 to the south. When you materialize, you will notice that T3 has disappeared. Look at the east wall at (3). There is a circular carving here. Place a crimson ring over the carving. The wall will dissolve and a void open up in front of you. Enter the void.
You are now at location (4) on level 2. The west wall has a circular carving that will allow you to return to level 1 if you use a crimson ring. But we have no need to return. At (5) there is a mage scroll of Fear. There are two more crimson rings lying on the floor at (6). Every time you try to approach them, they will move a square further away from you. To pick them up, drop the sticky paper on the floor next to them and you will be able to walk up to the rings and pick them up. The rings are only useful if you wish to make a return trip.
The plaque at (7) is just another hint at using the sticky paper on the rings. The circular carving at (8) should be obvious by now. Put a crimson ring over the carving to dissolve the wall. Enter the void beyond.
You are now at location (9) on level 3. Read the plaque at (10). Explain to me what it means if you ever figure it out. Be sure to pick up the MAPAJ coin at (11). Go through the illusionary walls to the west. There is a +3 plate mail at (12), a +2 robe and a SHALL REJOICE coin at (13). Take the stairs labelled H up to level 4.
Level 4 is very difficult, if not impossible to map. The walls and walkways shift every which way depending on your movements. Fortunately, there is only one item that you need from this level. And it is at location (14). Follow the route shown on the map. Be sure to turn and then move forward each time there is a direction change. This route is guaranteed to take you to location (14) successfully if you use it immediately after coming up the Stairs H.
You will meet a strange character at (14). Allow this character to TOUCH you. He will exchange the MAPAJ and the SHALL REJOICE coins that you found earlier with another coin. Be sure to pick up the coin from the floor. The go south 3 spaces and then west to the stairs labelled I.
There is another character at the NE corner that has a rather cryptic message. There is a green force field in a hallway at the SE corner. This force field can be eliminated by the mage spell of Disintegrate. It was told to me that Insal the thief was behind this force field, and that he also has a coin to give. I never found Insal behind the force field myself. And I'll leave it up to you to decide if you wish to explore this level further. When you are finished, take the stairs labelled I up to level 5.
Level 5 is just one long winding corridor. Beware of fireball hurling clerics, especially around location (1). You will find a bracer of protection after the fight. Be sure to use the illusionary walls to get to the last section of the corridor, avoiding teleporter T1. Take the Stairs J up to level 6.
There are two coin slots (2) and (3) on level 6 that control the two doors leading to the rest of the level. It is only necessary to open one of the two doors. Use the coin in the slot at (2). This opens the door to the west.
The rest of the doors at (4) through (7) can all be opened by pushing the buttons on the doors. There are high level clerics behind all these doors. Do not hesitate to use mage spells on them. And move aside when necessary to avoid their spells. At (8), the clerics will open the east door to fight you. You will find a +1 ring of protection after the battle. Take the Stairs K up to level 7.
There are only a couple of hell hounds on this level. Get rid of them and you may explore in peace. There is a plaque at (10). There are three altars at locations (13), (14) and (15), each one protected by a force field. There are a couple of notched disks on the walls at (11) and (12). Turn one of the disks all the way around so that the notch is at the 12 o'clock position. Make sure that the notch on the second disk is also at the 12 o'clock position. This shuts off the force field at (13). At the same time, the shaded wall next to the altar disappears. Approach the altar and place a glass sphere on it.
Next, turn both disks so that both notches are at the 3 o'clock position. The force field guarding the altar at (14) is turned off and the shaded wall next to the altar disappears. Put another glass sphere on the altar.
Repeat the same procedure for the altar at (15). This time turn both disks so that both notches are at the 6 o'clock position. Once you place a glass sphere on this third altar, you will see the hole in the ceiling. Go to the east side of location (16). Pull the ring on the wall and you will be teleported to level 8.
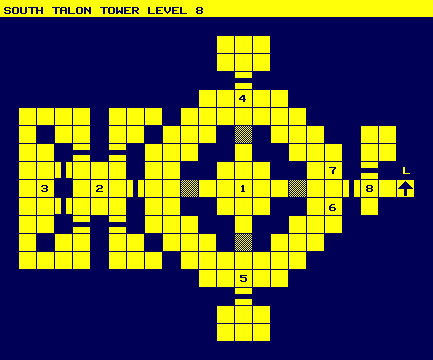
You are at location (1) when you first arrive at this level. Before doing anything else, let me describe the area layout for you.
The room to the west (locations (2) and (3)) is a generation center of mind flayers. Mind flayers are very tough because they cast psychic blasts that can easily paralyze most of your party in the first few rounds. You can never completely kill off all the mind flayers. The game generates more of them all the time. If you do want to explore the mind flayer rooms, make them your first destination after arriving at this level. Head west into the mind flayer room. You will probably be attacked by a salamander or two along the way, but they are fairly easy to beat. Once in the room, avoid stepping on location (2). Doing so will open both doors to the west and immediately summon numerous mind flayers. If you do not step on (2), you will have some time to check out all the surrounding areas before mind flayers appear. The only point of interest is the crystal ball at (3) which shows a few scenes depicting some events in the history of the Darkmoon Temple.
The room to the north (4) is inhabited by salamanders. They are not difficult to defeat and are especially susceptible to Cone of Cold spell. Again, the game will continuously generate more and more of them, so that clearing them out completely is impossible.
The room to the south (5) is empty and makes a nice resting place when necessary. Be aware that both the salamanders and mind flayers have the ability to open doors to come after you if they are close enough to sense your presence.
The door to the east has no buttons or keyholes. There are, however, two triangular niches on either side of the door, protected by blue force fields. Cast the cleric spell of Dispel Magic in front of each niche. The force field will disappear and you will find an amulet of life and an amulet of death respectively. Doing so also opens the door.
You will find a dying cleric when you enter this door. Pick up the stone cross that's lying on the floor. The room north of here has nothing of interest that I can find. You should rest here to recover your hit points. It's also a good idea to check your inventory and make sure your 2 fighters are equipped with the best weapons that you have. Take the Stairs L to level 9.
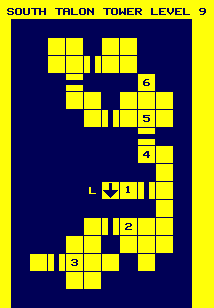
At (1) push the button on the door to open it. Once you enter this door, it will close automatically. There is no escape now until you have successfully killed Dran. The doors at (2), (3) and (4) can all be opened by pushing the buttons on them. You should cast the mage spell of Haste and then save your game before opening the door at (4).
You will confront Dran Draggore for a final time at (5). From this point on, it's a fight to the death. I never found a spell that's effective against Dran and trying to cast spells while doing the "fight and dance" routine only served to mess up my timing. Eventually, I simply resorted to pure hack n' slash.
The best way to battle Dran is to lure him south to one of the 2X3 areas. Swing at him once and then step aside. When he moves in front of you, have the other fighter take a swing and then step aside again. If he moves to your flank instead of in front of you, you must quickly move forward and then turn around to track him. With some practice, this dance routine is not difficult to perfect. But you almost must use the keyboard for movement and the mouse to swing the weapons in order to get the timing right. Every so often, Dran will actually move _away_ from you. If your party is in good shape, use this opportunity to save the game to record your progress.
Don't be too quick to congratulate yourself when Dran goes down the first time. Remember his namesake. The fight is only half over and your trouble is just beginning. The second half of the fight requires even quicker and better timing on your part but the logistics are the same. Good luck. The people at Waterdeep awaits report of your victory.